Module 2: Structural HTML Tags
Topics in
this Module
What's an HTML Tag?
In HTML, tags are the building blocks that structure and define the content of a webpage. Each HTML tag has a specific purpose and is composed of several parts. Understanding the anatomy of an HTML tag is essential for creating well-formed and semantically meaningful web content. In this tutorial, we'll break down the various components of an HTML tag.
Parts of an HTML Tag
An HTML tag consists of the following components:
- Opening Angle Bracket (<): The tag begins with an opening angle bracket (<), indicating the start of the tag.
- Tag Name: Immediately after the opening angle bracket, the tag name follows. The tag name represents the type of element the tag creates. Tag names are case-insensitive and must be in lowercase.
- Attributes: After the tag name, you can include one or more attributes. Attributes provide additional information about the element and are written in the format attributeName="attributeValue". Attributes are separated by spaces.
- Attribute Value: The value associated with an attribute is enclosed in double or single quotes. This value provides details that modify the behavior or appearance of the element.
- Closing Angle Bracket (>): The tag ends with a closing angle bracket (>), indicating the end of the tag. The closing angle bracket signifies that the tag is ready to receive its content.
- Content: For some tags, content comes between the opening and closing tags. This is where you place the actual content, such as text, images, or other nested elements.
- Closing Tag: Many HTML tags have a corresponding closing tag that mirrors the opening tag. The closing tag has the same tag name as the opening tag, but it includes a forward slash (/) before the tag name. The closing tag indicates the end of the element's content.
Example of an HTML Tag
Let's break down the anatomy of a simple HTML tag using the <a> (anchor) element as an example:
<a href="https://www.example.com">Visit Example</a>
In this example:
- Opening Angle Bracket (<): The tag starts with an opening angle bracket (<).
- Tag Name: The tag name is a, indicating an anchor element.
- Attributes: The href attribute specifies the URL that the anchor element links to. The attribute name is href, and the attribute value is "https://www.example.com".
- Closing Angle Bracket (>): The tag name and attributes are followed by a closing angle bracket (>).
- Content: Between the opening and closing tags, we have the text content "Visit Example," which will be displayed as a link.
- Closing Tag: The closing tag is </a>, where the forward slash (/) indicates the closing tag, and the tag name is a.
Conclusion
Understanding the anatomy of an HTML tag is fundamental to crafting well-structured and meaningful web content. Each part of an HTML tag serves a specific purpose, from the tag name and attributes to the content and closing tag. As you gain proficiency in HTML, this knowledge will enable you to create rich and organized webpages, enhancing user experience and ensuring proper rendering across various devices and browsers.
Structural Tags
HTML (Hypertext Markup Language) is the foundation of the World Wide Web, serving as the standard language for creating and structuring web content. It allows web browsers to interpret and display text, images, links, and multimedia elements in a structured manner. HTML documents consist of a series of tags enclosed in angle brackets, which define the structure and content of a webpage.
Major Structural HTML Tags
<html> Tag
The <html> tag is the root element of an HTML document. It encapsulates all other elements on the page. Here's an example:
<!DOCTYPE html>
<html>
    <head>
        <!-- Head content goes here -->
    </head>
    <body>
        <!-- Body content goes here -->
    </body>
</html>
<head> Tag
The <head> tag contains metadata about the document, including information that doesn't appear directly on the webpage itself. Commonly used within the <head> tag are the <meta>, <title>, and <link> tags.
<head>
    <meta charset="UTF-8">
    <meta name="description" content="A tutorial on HTML tags">
    <title>HTML Tutorial</title>
    <link rel="stylesheet" href="styles.css">
</head>
<body> Tag
The <body> tag contains the visible content of the webpage, such as text, images, and multimedia. It's where users interact with your content.
<body>
    <h1>Welcome to HTML Tutorial</h1>
    <p>This is an in-depth tutorial covering major HTML tags.</p>
</body>
<meta> Tag
The <meta> tag provides metadata about the HTML document. It's often used to specify character encoding, authorship, and other important information for browsers and search engines.
<head>
    <meta charset="UTF-8">
    <meta name="author" content="Your Name">
    <meta name="keywords" content="HTML, tutorial, web development">
</head>
<title> Tag
The <title> tag sets the title of the webpage, which appears in the browser's title bar or tab. It's also used by search engines when displaying search results.
<head>
    <title>HTML Tutorial</title>
</head>
<h1> - <h7> Tags
Heading tags are used to define headings and subheadings on a webpage. They provide structure to the content and are ranked in decreasing order of importance, with <h1> being the highest.
<body>
    <h1>Main Heading</h1>
    <h2>Subheading</h2>
    <h3>Sub-subheading</h3>
</body>
<p> Tag
The <p> tag represents a paragraph of text. It's used to structure and group text content.
<body>
    <p>This is a paragraph of text.</p>
    <p>Another paragraph follows.</p>
</body>
HTML Document Structure
Let's put together what we've learned so far.
The following HTML code represents a very simple web page:
<!DOCTYPE html>
<html>
    <head>
        <title>
            My Web Page
        </title>
    </head>
    <body>
        <h1>
            Welcome!
        </h1>
        <p>
            Hello World!
        </p>
    </body>
</html>
You can see the tags that we discussed earlier in this section. Note that in this document, each tag comes in a pair, with an opening tag and a closing tag. Closing tags have a forward slash ( / ) following the left angle bracket. In the HTML document structure, the opening and closing tags represent a sort of container. Each container can hold more containers, or some other kind of content. In this case, the content for this page is just text.
Here is an image that shows how the containers in this document are nested inside one another:
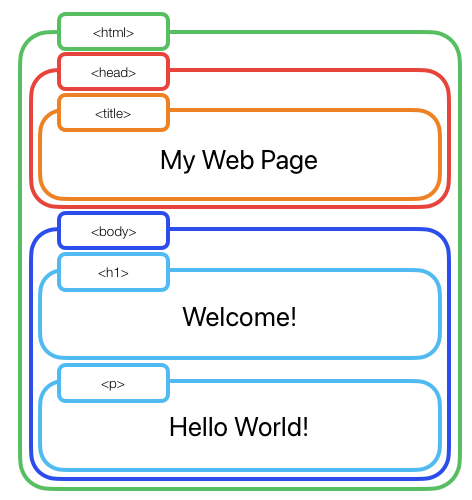
In the image above, I used different colors to make the containers easier to distinguish from one another. The <html> tag surrounds everything in the page, and is in green. There are two tags directly inside the <html> tag – In red, the <head> tag. Remember that the <head> tag contains the non-visible parts of a web page, which is usually instructions to the browser. In this document, the <head> tag only contains one thing: The <title> tag. The title of this web page is “My Web Page”. While this won't display on the page itself, you will see it in the tab of the window, and also if you bookmark or favorite this page.
The second tag contained within the <html> tag container is the <body> tag. This contains everything that appears on the web page itself, and is represented in red. Inside this <body> tag container, we have two items: A <h1> tag, which is a top level heading, and a <p> pag, which is a paragraph. They are displayed in. a light blue color on the diagram.
When this page is shown in a web browser, it will look like the following:
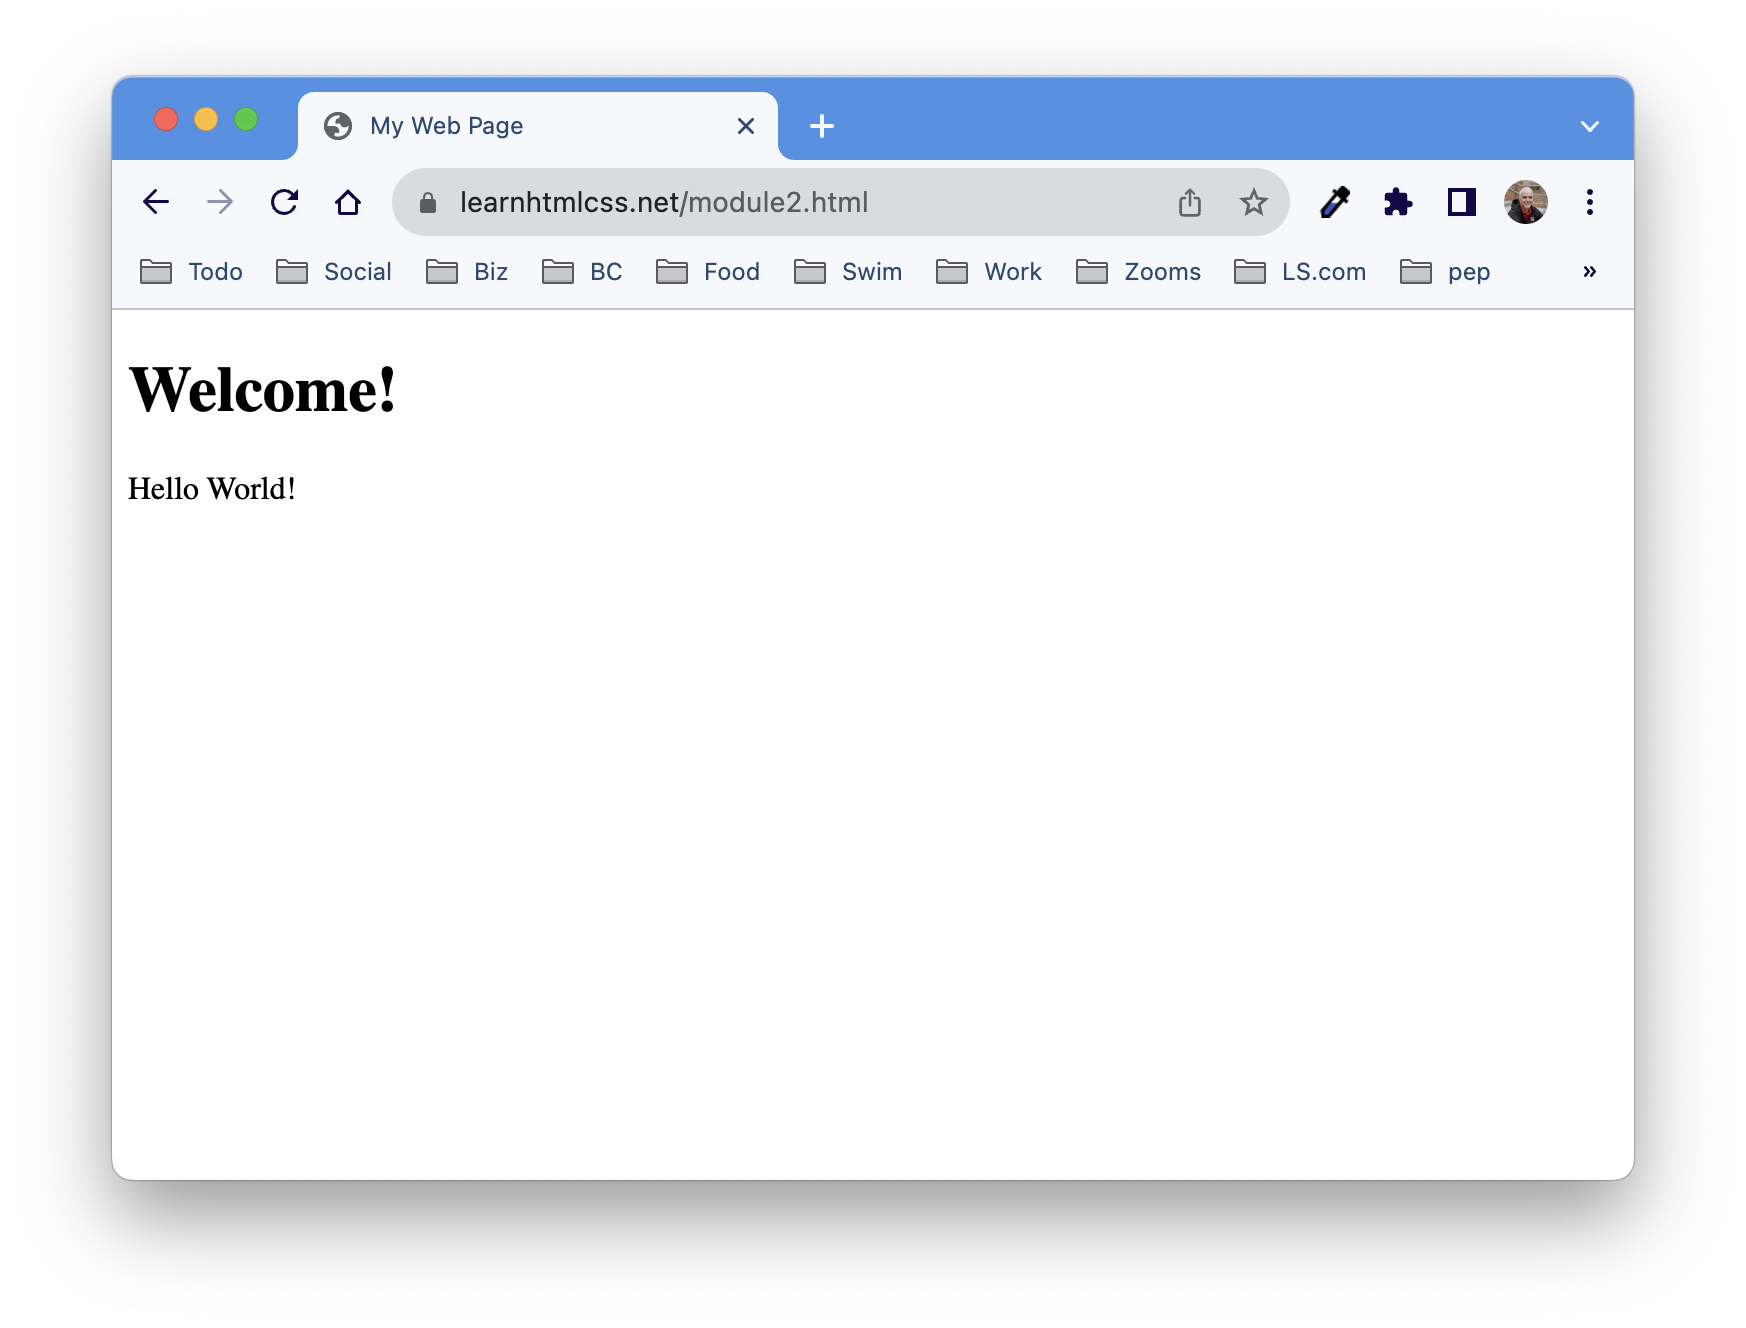
If you want to see the web page in your own browser, you can click here. You might also try right-clicking on the page if you are on a desktop or laptop, and choosing the “view source” option. This will show you the html code for the page, which should be identical to the code above.
Now you know the basic structure of an HTML page. Following a careful structure, you can create almost anything you can see on the web. Even the most complicated pages are just containers inside of other containers (there are just more of them, and they are decorated differently, but you'll learn that too).
Indenting Your Code
Reasons for Indenting HTML Code
Indentation is a practice of formatting code by adding consistent spaces or tabs (usually tabs) at the beginning of lines to visually organize and structure the code. While HTML code doesn't affect functionality based on indentation like some programming languages, proper indentation offers several benefits:
- Readability: Indented code is easier to read and understand, especially for humans. It helps identify nested elements and their relationships, making the code more comprehensible.
- Debugging: Properly indented code simplifies the process of identifying errors or inconsistencies in the structure. Mismatched tags, missing closing tags, and nesting issues are more noticeable when code is indented.
- Collaboration: When working on projects with other developers, consistent indentation promotes a uniform coding style, leading to better collaboration and code maintenance.
- Documentation: Well-indented code serves as a form of documentation, making it easier for others (or yourself in the future) to understand the code's logic and organization.
- Troubleshooting: Indentation aids in isolating sections of code for testing and debugging, making it simpler to identify where potential issues might lie.
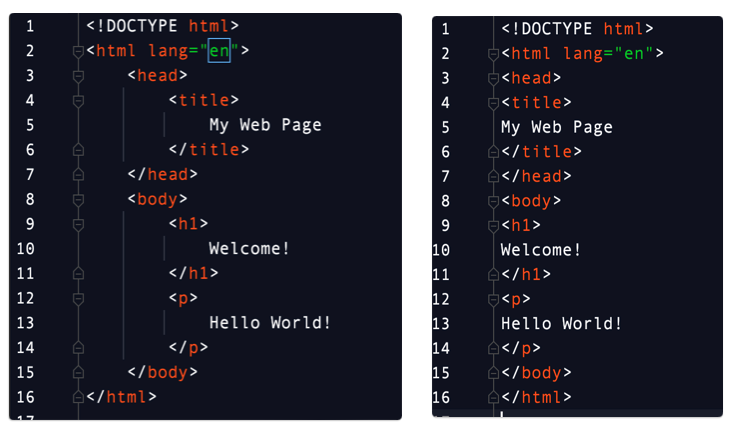
Take a look at the image below, depicting two code samples. Both will display the exact same thing in the web browser. Which one seems easier to read and figure out? Keep in mind that this page is much simpler than most pages you would see online. The indentation of the code makes a big difference in readability.
Here is the same code again, but with blue arrows added to show where the tabs have been inserted.
Method for Indenting HTML Code Using Tabs
Indenting HTML code using tabs involves adding a consistent number of tab characters at the beginning of each line to represent nesting levels. Tabs are a popular choice for indentation due to their flexibility, as the actual spacing can be customized in text editors or IDEs to match personal preferences.
Here's a step-by-step method for indenting HTML code using tabs:
- Choose an Editor: Use a text editor or integrated development environment (IDE) that supports tab-based indentation. Common choices include Visual Studio Code, Sublime Text, Atom, and many others. Many of the examples in this book use PHPStorm, which is free for students.
- Configure Tab Settings: In your chosen editor, configure the tab settings to define how many spaces each tab represents. Most editors allow you to set the tab width, which determines the number of spaces added when you press the Tab key. PHPStorm will indent code automatically if you want it to.
- Insert Tabs for Each Level: Indentation is applied to indicate nesting levels. For each nested element, insert one tab before the opening tag, align attributes and content, and close the tag aligned with the opening tag. Use additional tabs for deeper levels of nesting.
- Maintain Consistency: Throughout the document, ensure a consistent number of tabs are used for each nesting level. This consistency enhances readability and reduces confusion.
- Auto-Formatting: Many text editors provide auto-formatting or auto-indentation features that automatically adjust the indentation of your code. These features can be helpful to maintain consistent formatting without manual effort.
- Review and Adjust: After indenting the code, review it for clarity and correctness. Adjust indentation as needed to ensure proper alignment and hierarchy.
Remember that the goal of indentation is to make the code more understandable, so choose a consistent method and stick to it. Whether you use tabs, spaces, or a combination of both, the key is maintaining a clear and logical structure throughout your HTML code.
Overlapping Tags
Overlapping tags in HTML documents occur when one HTML element is not properly closed before another element is opened. This results in the elements overlapping each other, potentially leading to unexpected rendering, broken layouts, and content display issues. Overlapping tags can cause confusion for both browsers and developers trying to interpret and render the page correctly.
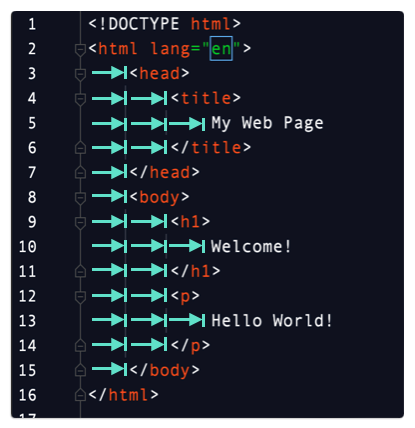
In the image below, you can see an example of overlapping tags. The paragraph <p> tag, indicated by one set of arrows, is opened before the <h1> tag is closed, but it isn't fully nested inside the <h1> tag container either. This is a very common problem experienced by beginning HTML coders. It can result in all kinds of crazy things going wrong when your page is displayed. Luckily, most advanced code editors help you by highlighting overlapping tags for you. In fact, you can see that my code editor highlighted the problem in yellow below.
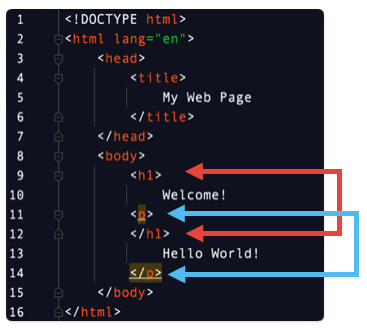
If you are having trouble seeing the image above, here is the code in text, so you can read (and test it) for yourself:
<!DOCTYPE html>
<html lang="en">
    <head>
        <title>
            My Web Page
        </title>
    </head>
    <body>
        <h1>
            Welcome!
        <p>
        </h1>
            Hello World!
        </p>
    </body>
</html>
Why Overlapping Tags are a Problem
Overlapping tags are problematic because they violate the structural integrity of the HTML document. They can lead to various issues:
- Rendering Errors: Browsers may struggle to interpret overlapping tags, resulting in incorrect rendering of content. This can lead to visual inconsistencies and broken layouts.
- Unpredictable Behavior: Overlapping tags can cause unpredictable behavior as browsers attempt to make sense of the conflicting markup, potentially leading to content being hidden, displayed incorrectly, or ignored.
- Accessibility Issues: Overlapping tags can hinder accessibility features, such as screen readers, from correctly interpreting the content and providing meaningful information to users with disabilities.
- Code Maintenance: Overlapping tags make the codebase harder to maintain. Developers may find it challenging to understand and modify the code, leading to longer debugging times.
- Cross-Browser Compatibility: Different browsers might handle overlapping tags differently, leading to inconsistencies in how the page is displayed across various platforms.
Finding and Fixing Overlapping Tags
Identifying and rectifying overlapping tags involves careful inspection and validation of your HTML code. Here's a step-by-step guide to finding and fixing overlapping tags:
- Validate HTML: Use online HTML validation tools or integrated development environment (IDE) plugins to check for syntax errors and potential issues in your HTML code.
- Review Editor Highlights: Some text editors or IDEs highlight errors such as unclosed tags or overlapping elements. Pay attention to any visual cues that indicate issues.
- Visual Inspection: Manually inspect your code for any instances where an opening tag is not properly closed before another opening tag is encountered. Focus on elements that are likely to cause issues, such as inline elements within block-level elements.
- Pay Attention to Nesting: Check if the nesting of your elements follows a logical structure. For instance, a <div> or <span> element should be closed before an enclosing block element like <p> or <h1> is opened.
- Review Attributes: Overlapping tags can also occur due to misplaced attributes or missing attribute values. Ensure that attributes are placed within the correct tags and that their values are enclosed properly.
- Use Valid HTML: Follow the HTML specification and ensure that each opening tag is followed by its corresponding closing tag. Use self-closing tags for elements that don't have explicit closing tags, like <img> or <br>.
- Test in Different Browsers: After making fixes, test your page in multiple web browsers to ensure consistent rendering and behavior.
- Automated Testing: Implement automated tests that include checks for overlapping tags to catch such issues early in the development process.
Conclusion
Overlapping tags in HTML documents can have adverse effects on rendering, accessibility, and code maintainability. Regularly reviewing your HTML code and following best practices for proper nesting and closing of tags can help prevent these issues. By understanding the potential pitfalls of overlapping tags and applying careful validation and debugging techniques, you can ensure that your HTML documents are structurally sound and render as intended across various browsers and devices.
Videos for Module 2: Structural HTML Tags
There are no videos yet this term for this Module. Check back soon!
Activities for this Module
S2 - Liveweave Recipe Structure
For this Sandbox Challenge, we’ll be using basic structural HTML tags to format the text for a chocolate chip cookie recipe.
Start out by .
Next, open and load the base template by clicking Tools > Load Base Template.
In the HTML pane of the base template, delete the line of code that reads as follows:
<p class="lw">Hello Weaver!</p>
Select all of the text in the recipe text file, and paste it into the HTML pane of the Liveweave window.
If you look at the preview pane, you should see a solid block of text with no formatting or line breaks. That’s because a web browser ignores our plain text line breaks. A web browser also ignores tab characters, and anything more than one consecutive space.
Now, we will add HTML tags to the text we pasted in to format it properly:
- First, we will turn “Chocolate Chip Cookie Recipe” into a level-1 heading. At the front of this line, add the <h1> tag. At the end, add the </h1> tag, which is the same as the first one but includes a forward slash, which means it is a closing tag. Almost every HTML tag comes in a pair, with an opening and closing tag. The text between them is called the content of that tag. Now, the first line of the text should look like this:
<h1>Chocolate Chip Cookie Recipe</h1>- Take a look at what happened in the preview pane.
- Next, make the “Ingredients” line a level-2 heading using <h2> and </h2>, like this:
<h2>Ingredients</h2>- The whole list of ingredients should be a single paragraph, so let’s put <p> before the first ingredient and </p> after the last one, like this:
<p>
1 cup (226g) unsalted butter, softened
3/4 cup (150g) granulated sugar
3/4 cup (165g) packed brown sugar
1 teaspoon vanilla extract
2 large eggs
2 1/4 cups (280g) all-purpose flour
1 teaspoon baking soda
1/2 teaspoon salt
2 cups (350g) semisweet chocolate chips
Optional: 1 cup (120g) chopped nuts (walnuts or pecans)
</p>- Notice that the ingredients are still a huge blob. They belong together, but we do want them to have a line break after each one, so we need to tell the web browser what to do. Add a <br> tag at the end of each line (except for the last one, since it has the end of the paragraph to take care of that for us), like this:
<p>
1 cup (226g) unsalted butter, softened<br>
3/4 cup (150g) granulated sugar<br>
3/4 cup (165g) packed brown sugar<br>
1 teaspoon vanilla extract<br>
2 large eggs<br>
2 1/4 cups (280g) all-purpose flour<br>
1 teaspoon baking soda<br>
1/2 teaspoon salt<br>
2 cups (350g) semisweet chocolate chips<br>
Optional: 1 cup (120g) chopped nuts (walnuts or pecans)
</p>- Wait a minute! You forgot the </br> closing tags! JUST KIDDING. Line breaks are one of the very few exceptions to the “every opening tag should have a closing tag” rule.
- Do you like walnuts or pecans in your cookies? Gross. Not for me. We need to make sure that OPTIONAL ingredient stands out, so people don’t accidentally ruin their cookies. Lets use emphasis tags around that last line, like this:
<em>Optional: 1 cup (120g) chopped nuts (walnuts or pecans)</em>- When we put tags inside of tags like this, it’s called “nesting”. When nesting tags, be careful that your beginning and end tags are completely inside the outer set of tags. For example, in the <em> tags above, the </em> tag is supposed to come before the </p> tag of the paragraph that it is contained within. Crossing nested tags is very dangerous, like crossing the streams in the OG Ghostbusters. IYKYK.
Take a look at what you’ve got so far. Not too bad!
- But some <h2> tags around the Instructions next.
- On the heading for the first instruction, use <h3> tags like this:
<h3>1. Preheat Oven and Prepare Pans:</h3>- The instruction itself should have a <p> and </p> around it.
- Keep going now — Finish this pattern for the rest of the recipe.
- Try more <em> and also <strong> tags to highlight important parts of the recipe.
- When you’re done, take a screenshot of the window and upload it to the discussion forum, answering the questions for the sandbox.
Post the following for credit:
- You can post screenshots of your code or the results of your code.
- Something you learned from this.
- Something you struggled with or found difficult.
Please return to this discussion throughout the module, and see if you can either learn from your classmates' work or help them develop their understanding. While I don't count posts, I expect each of you to post your Sandbox Challenge and reply to about 1 classmate per module.
A2 - HTML Resume
The Challenge
Use either the resume template text (linked below), or your own resume information if you wish (as long as it is similar in terms of the amount of data), and complete the following two parts of the assignment:
Use the basic HTML tags that you have learned so far to turn the text into a well-formatted HTML document, which uses headings and other structural elements properly.
Constraints
- You should use the text document provided, or your own text as long as it is similar in size and content.
- You should write all of your own code.
Resources
Resume Text File
Grading / Success Criteria
To earn credit for this assignment, it must:
- Include the full text of the provided resume, or an equivalent-length resume text of your choosing.
- Use the structural tags covered in this module, including (h1-h5, p, body, head, title)
- Use appropriate closing tags for each opening tag.
- Be uploaded to your web server and display properly.